A Revolutionary Repair Technique Revealed
 Emma Newman
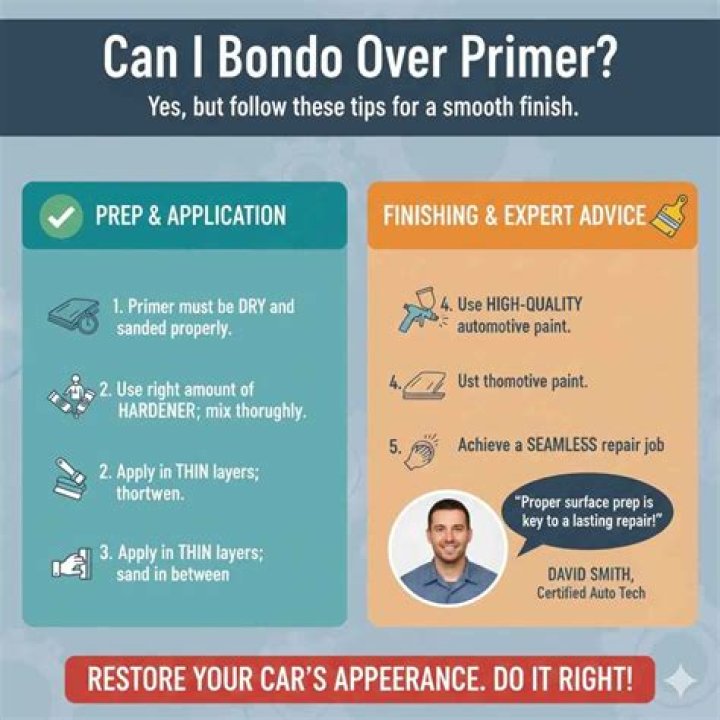
Applying Bondo Over Primer
Bondo is a type of auto body filler used to repair dents and other imperfections in metal surfaces. Primer is a coating applied to metal surfaces before painting to improve adhesion and prevent corrosion. While primer is not strictly necessary for Bondo to adhere, it can help to create a stronger bond and a more durable repair.
There are a few things to keep in mind when applying Bondo over primer. First, the primer must be completely dry before applying Bondo. Otherwise, the Bondo will not adhere properly and may eventually fail. Second, the Bondo should be applied in thin layers and allowed to dry completely between each layer. This will help to prevent the Bondo from cracking or peeling.
With proper preparation and application, Bondo can be used to repair a variety of metal surfaces. It is a versatile and durable material that can save you time and money on auto body repairs.
Can You Apply Bondo Over Primer?
When repairing dents and other imperfections in metal surfaces, it is important to understand the compatibility between different materials. One common question is whether bondo can be applied over primer. The answer is yes, but there are a few things to keep in mind to ensure a successful repair.
- Preparation: The primer must be completely dry before applying bondo. Otherwise, the bondo will not adhere properly and may eventually fail.
- Application: The bondo should be applied in thin layers and allowed to dry completely between each layer. This will help to prevent the bondo from cracking or peeling.
- Sanding: Once the bondo is completely dry, it should be sanded smooth before painting. This will help to create a smooth, even finish.
- Durability: Bondo is a durable material that can withstand the elements and provide a long-lasting repair.
- Cost-effective: Bondo is a relatively inexpensive material, making it a cost-effective option for repairing metal surfaces.
By following these simple tips, you can ensure that your bondo repair is successful and long-lasting. Bondo is a versatile and durable material that can be used to repair a variety of metal surfaces, making it a valuable tool for any DIYer or auto body professional.
Preparation
When applying bondo over primer, it is crucial to ensure that the primer is completely dry before proceeding. This is because moisture can cause the bondo to fail to adhere properly, leading to a weak and ineffective repair. The following are some of the key points to consider in relation to this preparation step:
- Drying Time: The drying time for primer can vary depending on the specific product being used. It is important to consult the manufacturer's instructions and allow sufficient time for the primer to dry completely before applying bondo.
- Environmental Conditions: The drying time for primer can also be affected by environmental conditions, such as temperature and humidity. In cold or humid conditions, the primer may take longer to dry. It is important to take these factors into account and allow extra drying time if necessary.
- Testing for Dryness: Before applying bondo, it is important to test the primer to ensure that it is completely dry. This can be done by lightly touching the primer with your finger. If the primer feels tacky or wet, it is not yet dry and you should allow more time for drying.
- Consequences of Applying Bondo Over Wet Primer: If bondo is applied over wet primer, it can lead to a number of problems, including poor adhesion, cracking, and peeling. In severe cases, the bondo may even fail completely, requiring the repair to be redone.
By following these simple guidelines, you can ensure that the primer is completely dry before applying bondo, which will help to ensure a strong and durable repair.
Application
Applying bondo in thin layers is crucial to achieving a strong and durable repair when working with primer. Let's explore the connection between this application technique and the overall process of applying bondo over primer:
- Preventing Cracks and Peeling: Applying bondo in thin layers allows each layer to dry completely before the next layer is applied. This helps to prevent the bondo from shrinking and cracking as it dries, which can lead to a weakened repair. By allowing each layer to dry thoroughly, the bondo forms a strong bond with the primer and the underlying surface, reducing the risk of peeling or cracking.
- Better Bonding: Applying bondo in thin layers promotes better bonding between the bondo and the primer. When bondo is applied in thick layers, it can create air pockets or voids within the material. These imperfections can weaken the bond between the bondo and the primer, making the repair more susceptible to failure. By applying thin layers, you can minimize the formation of air pockets and ensure a strong bond between the materials.
- Easier Sanding: Applying bondo in thin layers makes it easier to sand and shape the material once it has dried. Thinner layers are less likely to create lumps or bumps, resulting in a smoother surface that is easier to sand and blend with the surrounding area. This can save time and effort during the repair process.
In conclusion, applying bondo in thin layers is an essential step when working with primer to ensure a successful repair. By following this application technique, you can prevent cracking and peeling, promote better bonding, and make the sanding process easier. These factors contribute to a durable and long-lasting repair that will withstand the elements and provide a seamless finish.
Sanding
Sanding is an essential step in the process of applying bondo over primer, as it helps to create a smooth, even surface that is ready for painting. Without sanding, the bondo may have a rough or uneven texture, which would be visible once painted. In addition, sanding helps to remove any imperfections or debris from the surface of the bondo, ensuring a strong and durable bond between the bondo and the primer.
There are a few things to keep in mind when sanding bondo. First, it is important to use the correct type of sandpaper. A medium-grit sandpaper (around 220-grit) is a good starting point. You can then switch to a finer-grit sandpaper (around 400-grit) to smooth the surface even further. Second, it is important to sand in a circular motion, using light pressure. Avoid sanding too aggressively, as this can damage the bondo or the primer.
Once the bondo has been sanded smooth, it is ready for painting. Painting the bondo will help to protect it from the elements and give it a finished look. You can use any type of paint that is suitable for metal surfaces, such as automotive paint or enamel paint.
By following these simple steps, you can ensure that your bondo repair is smooth, durable, and ready for painting.
Durability
The durability of bondo is a key factor in its effectiveness as a repair material, especially when applied over primer. Primer helps to protect the metal surface from corrosion and provides a strong bond for the bondo to adhere to. This combination creates a repair that is resistant to the elements and can withstand wear and tear over time.
There are several reasons why bondo is so durable. First, it is a very strong material. It is resistant to cracking, peeling, and chipping. Second, bondo is waterproof and can withstand exposure to moisture and chemicals. Third, bondo is flexible and can conform to the contours of the surface being repaired. This makes it ideal for repairing complex shapes and curves.
The durability of bondo makes it a valuable tool for a variety of repair applications. It can be used to repair dents, holes, and other damage to metal surfaces. Bondo can also be used to fill in gaps and create smooth, even surfaces. It is a versatile material that can be used for both small and large repairs.
When applied over primer, bondo creates a durable and long-lasting repair that can withstand the elements and provide years of service.
Cost-effective
The cost-effectiveness of bondo is a significant factor in its popularity as a repair material, especially when applied over primer. Primer helps to protect the metal surface from corrosion and provides a strong bond for the bondo to adhere to, while bondo itself is a relatively inexpensive material. This combination makes it a cost-effective solution for a variety of repair applications.
- Affordability: Bondo is significantly less expensive than other repair materials, such as fiberglass or welding. This makes it a more accessible option for DIYers and those on a budget.
- Value for money: Despite its low cost, bondo is a high-quality repair material that provides excellent durability and longevity. This makes it a cost-effective option in the long run, as it is less likely to require repairs or replacements.
- Versatility: Bondo is a versatile material that can be used for a variety of repair applications, including filling dents, holes, and other damage to metal surfaces. This eliminates the need to purchase multiple repair materials for different types of damage, saving money.
The cost-effectiveness of bondo makes it an excellent choice for repairing metal surfaces, especially when applied over primer. It provides a durable, long-lasting repair at a fraction of the cost of other repair materials.
FAQs on Applying Bondo Over Primer
This section addresses frequently asked questions (FAQs) regarding the application of bondo over primer. These FAQs aim to provide clear and concise answers to common queries, helping readers gain a thorough understanding of the process.
Question 1: Can I apply bondo directly to bare metal without primer?No, it is not recommended to apply bondo directly to bare metal without primer. Primer serves as a protective barrier between the metal surface and the bondo, preventing corrosion and ensuring a strong bond. Applying bondo without primer can compromise the durability and longevity of the repair.
Question 2: What type of primer should I use before applying bondo?For best results, use an automotive-grade primer specifically designed for metal surfaces. These primers are formulated to promote adhesion between the metal and the bondo, ensuring a durable and long-lasting repair.
Question 3: How long should I let the primer dry before applying bondo?Allow the primer to dry completely before applying bondo. The drying time may vary depending on the specific primer used, so consult the manufacturer's instructions. Adequate drying ensures proper adhesion and prevents the bondo from peeling or cracking.
Question 4: Can I apply multiple layers of bondo?Yes, you can apply multiple layers of bondo, but each layer should be thin and allowed to dry completely before applying the next. This helps prevent shrinkage, cracking, and ensures a smooth and even surface.
Question 5: How do I sand bondo after it has dried?Once the bondo has dried completely, use sandpaper to smooth the surface. Start with coarse-grit sandpaper to remove excess bondo and shape the surface, then gradually switch to finer-grit sandpaper to achieve a smooth finish.
Question 6: Is it necessary to paint over bondo?Yes, it is recommended to paint over bondo to protect it from moisture, UV rays, and other environmental factors. Painting also improves the appearance of the repair and helps it blend seamlessly with the surrounding surface.
By addressing these common questions, we aim to empower readers with the knowledge and confidence to successfully apply bondo over primer and achieve durable and professional-looking repairs.
Moving forward, we will explore advanced techniques and best practices for working with bondo, providing valuable insights to enhance your skills and ensure exceptional results.
Tips for Applying Bondo Over Primer
Applying bondo over primer is a common technique used to repair and restore metal surfaces. To achieve a successful and durable repair, it is crucial to follow proper procedures and utilize effective techniques. Here are some tips to guide you through the process:
Tip 1: Surface Preparation
Thoroughly clean and prepare the metal surface before applying primer. Remove any dirt, grease, or rust to ensure a strong bond between the primer and the metal.
Tip 2: Primer Selection
Use an automotive-grade primer specifically designed for metal surfaces. This type of primer promotes adhesion and provides a protective barrier against corrosion.
Tip 3: Primer Application
Apply the primer in thin, even coats, allowing each coat to dry completely before applying the next. Adequate drying time ensures proper adhesion and prevents peeling or cracking.
Tip 4: Bondo Application
Apply bondo in thin layers, allowing each layer to dry thoroughly before applying the next. This helps prevent shrinkage and cracking, resulting in a smooth and durable surface.
Tip 5: Sanding
Once the bondo has dried completely, sand the surface using progressively finer grits of sandpaper. Start with coarse-grit sandpaper to shape the surface, then switch to finer grits to achieve a smooth finish.
Tip 6: Painting
To protect the bondo and enhance its appearance, apply a coat of paint specifically designed for metal surfaces. This will prevent moisture and UV damage, ensuring a long-lasting repair.
Benefits of Following These Tips:
- Improved adhesion between primer and metal
- Enhanced durability and longevity of the repair
- Prevention of peeling, cracking, and shrinkage
- Achieving a smooth and professional-looking finish
By adhering to these tips, you can effectively apply bondo over primer, resulting in a durable and aesthetically pleasing repair that will withstand the test of time.
Conclusion
Applying bondo over primer is a crucial technique in metal repair, providing a durable and long-lasting solution. By understanding the importance of proper surface preparation, primer selection, and application techniques, you can achieve a successful repair that restores the integrity and appearance of metal surfaces.
Remember, adhering to the tips and best practices outlined in this article will empower you to effectively apply bondo over primer, ensuring a strong bond, preventing cracking or peeling, and achieving a smooth and professional-looking finish. Whether you are a seasoned professional or a DIY enthusiast, these guidelines will enhance your skills and enable you to tackle metal repair projects with confidence.
Unlock The Enchanting World Of Brian Andreas: Discoveries And Insights
Unveil The Enigmatic Tais Bean: Discoveries And Insights For CultureC
Unveiling Essence Atkins' Heritage: A Journey Of Identity And Inspiration